Monday, September 29, 2014

Free Primitive Sew Along, layout so far, and part 7!

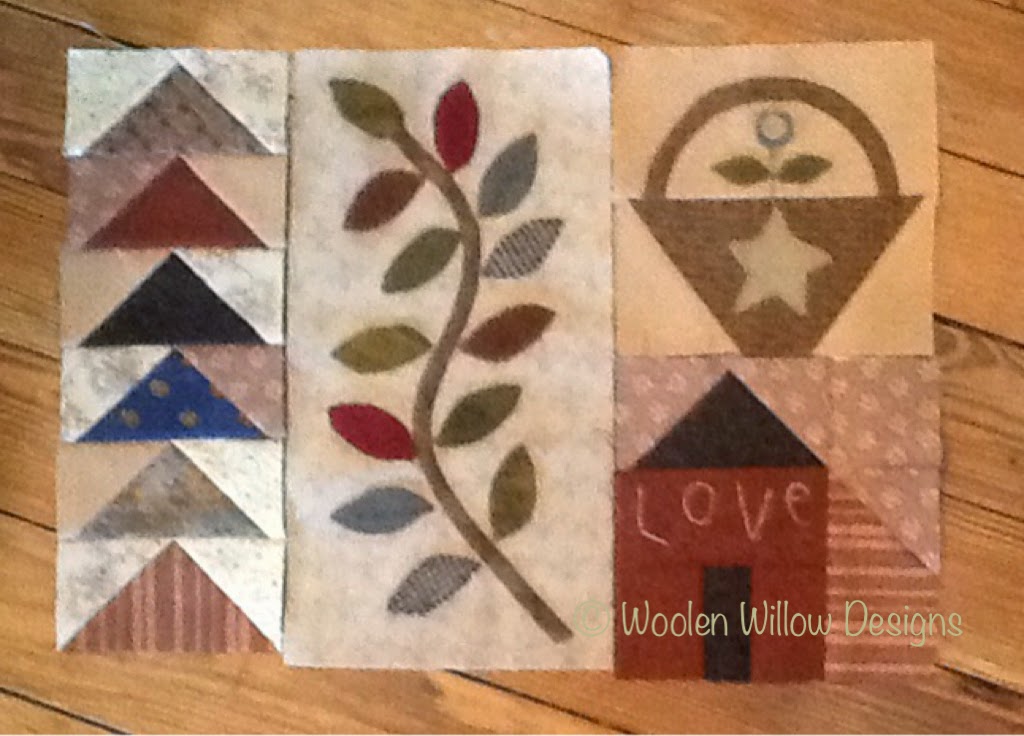
Some of you have asked how the layout will be. I haven't sewn the parts together yet, so don't worry! That will come! Here is how I plan to lay out the blocks we have so far! I would wait to sew anything together though, so it will fit nicely once it's ready!

I'm including directions for the next part, but the templates may not be up on my website yet.... Maybe in the next day or so! But so you could see the photo, I'm including it!


For each of the little blocks below, you will need a 5" square background. My basket is made from brown textured hand dyed wool, whip stitched down with brown wool thread. The flower is red hand dyed wool, stitched down with long stitches held together in the middle of the flower with a small tack stitch. The stem is back stitched with hand dyed green perle cotton thread, from my Valdani Collection on my website, and lazy daisy stitches for the leaves! After the appliqué is complete, trim the block to 4 1/2" square!

For the pumpkin, I used hand dyed velvet, I purchased from Blackberry Primitives, and a tiny piece of hand dyed brown wool for the stem. I turned the edges under for the velvet appliqué, so I needed to add 1/4" seam allowance to the template. If you are using wool, you won't need the addition of the seam allowance. I used cotton brown thread to back stitch the detail lines on the pumpkin. Trim block to 4 1/2" square, once appliqué is done!

Enjoy!!

Jeni


Monday, September 22, 2014

The winner, and the next blocks!

The winner of the "Name the Quilt" Contest is.........

And just so you know, it was very very hard!!!! I enlisted a lot of help going through the names, and I apologize for not getting the winner posted until now!

Drum roll please..........

 
L

Leeanne! " A Life of Plenty" was the overwhelming favorite!

Leeanne, if you will email me your info at woolenwillowdesigns@gmail.com, I will send your prize when I get back from the Winter issue Press check Friday!


Here is a photo of one of the four blocks you will be making!


I don't have all four of mine made, but will after the press check later this week!

Here are your instructions!

Here are mine! (The template includes a 1/4" seam allowance!)


I just stuck my scissors there so you can see the unsewn part of the first two patches!


Now finish up that partial seam and voila!


TaDa!! Don't sew them together though! They look neat all sorts of directions! I'll show you how I plan to put them in the quilt soon!

Have fun making them, they are addictive!!!

Have a great week, and if I can get any sewing done while out of town, I'll post again at the end of the week!

Jeni


Thursday, September 18, 2014

Free sew along, Part 5!

Here is part 5!


Cut the background 7" x 13" and mark a line (with a disappearing pencil) at 6"x 12" so you know how close the appliqués can be to the edge. After stitching is complete, trim block to 6 1/2" x 12 1/2"

The stems are on bias, and finish at 3/8" wide x 10 1/2" and 3/8"x 7 1/4." I used the clover bias maker tool for my cotton stems, but you may use your favorite method!

The leaves are several colors and are made from wool, whip stitched down with my favorite wool threads! If you would like a set, we have them for sale on www.primitivequiltsandprojects.com. The flowers are also made from wool!

I love the photos some of you have been sending! Feel free to post them on my www.woolenwillowdesigns.com FaceBook page!!

Enjoy!!

Jeni

Don't forget the "Name this Quilt" contest a couple of posts back! There is still time!!


Friday, September 12, 2014

Surprise! Block #4!

Since #3 blocks were so quick, here is another to work on over the weekend! You can see that I'm not done stitching either! I'll be finishing that up, and getting the next one ready for you as well! Are you having fun yet??? I've been getting beautiful show and tell photos from some of you! I love that, so thank you! Feel free to post your pictures on Woolen Willow Designs Facebook page!!
For this block, cut your background 7" x 13" , draw lines in it for 6"x 12" so you know not to put your pieces too close to the edge! After you appliqué, trim to 6 1/2" x 12 1/2" ready to add to your quilt! Don't sew this on just yet though! That will come in due time!! The template page is up on my website, www.woolenwillowdesigns.com! The middle and right side bias stems are 3/8" x 5 1/4", and 3/8"x 3 1/2" finished. The left stem is 1/8" x 2 1/2" finished. There are no seam allowances included in the pot or leaves.

Have a great weekend, and happy stitching!
Jeni, who is loving this cooler weather!


Tuesday, September 9, 2014

Part 3 Primitive Sew along quilt, and a contest!

Hello friends! This is a small one, but we can have more fun later in the week with a second installment! We will be making three flying geese units, as the one in the first post, only one of the units will only have 5 flying geese, and the other two will have 6! Go to the first post, and get those instructions, if you didn't write it down! The other block is a cute little basket block! You will find the instructions below the picture!

For the contest.....help me name this quilt! You must be a follower of both the primitive Quilts and Projects blog, and of my Jeni from the Willow blog, post a comment, on either blog, with what you would name the quilt......there will be lots of things in the quilt such as, pumpkins, a cat, a flag, more flower type blocks, and etc... So let's see what you can come up with! We will go through all the titles, and judge to find the one we like best! That will be the winner, who will receive a beautiful package of my assorted 10" square hand-dyed wool pieces! So get thinking! I will pick the winner on Sept. 20th.
Here are your blocks....and don't sew these onto the previous units just yet!

Step one....
* make a half square triangle unit (HST) by cutting one light, and one medium 4 1/2" square. Draw a diagonal line on the back of the light square, put them right sides together and sew a seam 1/4" away from the drawn line on both sides. Cut on drawn line, press open, and square to 3 1/2". You will only need one for this block.
Step two...
*make two (HST) units, as above, using a light and medium 2 1/2" square. Square up to 1 1/2" each. You will need both for this block.
Step three...
*cut two rectangles from the light fabric 1 1/2" x 2 1/2", and one 1 1/2" square.
Step four...
Lay pieces out as in the diagram above, and sew together.
Step five...
* make a bias strip from the medium fabric (I use the Clover Bias tape makers) that finishes at 1/2" x 4 1/2", and curve it with an iron and spray baste. Pin in place and appliqué!
Happy sewing, and good luck with the contest!
Jeni...who is loving all the photographs you are sending me!! Thank you so much!!

Thursday, September 4, 2014

Little hooked mat

I hooked this little 8 1/2" square mat up last night. I know it's just the beginning of September, but I just can't help it! I love making things with pumpkins!

I've got some stitcher, and rug hooking friends coming over this evening, so maybe I'll get it bound! It's not on the website yet, but hopefully will be soon! In the meantime, you know how to reach me if you need the pattern!

If I can dig out my little fall quilts, I'll snap a new photo and post them soon, they look so much nicer close up, than on the website! Plus, it is time to get them out, right?

Have a great evening, and watch for the next installment of the sew along!!

Jeni


Tuesday, September 2, 2014

Part 2 Sew along!

Are you ready for the next part? I hope so! You will be able to just go to my website www.woolenwillowdesigns.com, and to the sew along template page to download your templates! The written instructions will be here to read, and jot down on your template sheets if you wish!

For the Basket block.....

*cut B and D from light fabric, with the template.

*Cut C from a dark fabric. Sew B/C/D together.

*Cut a 3 1/2" x 6 1/2" rectangle from the same light print, sew to the top of the above unit.

*Cut out the handle from the dark fabric, adding a seam allowance if you are turning under to appliqué, and appliqué in place.

*use scraps of wool to make the flower, leaves, and star. I whip stitched them down with matching wool threads. For the stem, I used a pretty green perle cotton from my Woolen Willow Valdani collection! The block should measure 6 1/2."

* For the house block cut...

One 2 1/2" x 4 1/2" dark for roof

One 1 1/2" x 2 1/2" dark for door

One 2 1/2" x 4 1/2" med. for house

Two 2"x 2 1/2" of same med. for either side of door

Four 2 1/2" squares of light for sky

One 2 1/2" x 4 1/2" medium for side of house

*Make a flying geese unit as in block one, using two 2 1/2" light squares and the 2 1/2" x 4 1/2" dark for the roof.

*Make a half flying geese unit with a light 2 1/2" square and the side of house medium print

*Sew the 2"x 2 1/2" med prints to either side of the dark 1 1/2" x 2 1/2" piece.

*Arrange these units following the diagram, and sew together.
*Use a chalk pencil or disappearing pen to write the word LOVE above the door unit, and embroider with a contrasting perle cotton. I used a stem stitch, and a pretty neutral from my Valdani collection. You could also use a back stitch.


Feel free to sew these units together as we go, and I'll try to make sure I give them to you in order!

Have fun, and show me your progress! My email is woolenwillowdesigns@gmail.com!

Jeni